Launch Points Taxiing Take-Off Outbound Routings Landing Parking Grid Position Soft Ground
Launch Points
The main take off run is on the flat area, and has recently been levelled to make it relatively smooth. The gliders must be lined up behind this area, there is space for two gliders side by side, providing the control tower is in the correct position.
A second take off run is situated on hangar ridge adjacent to the hill and is mainly used for grid launches.
Taxiing
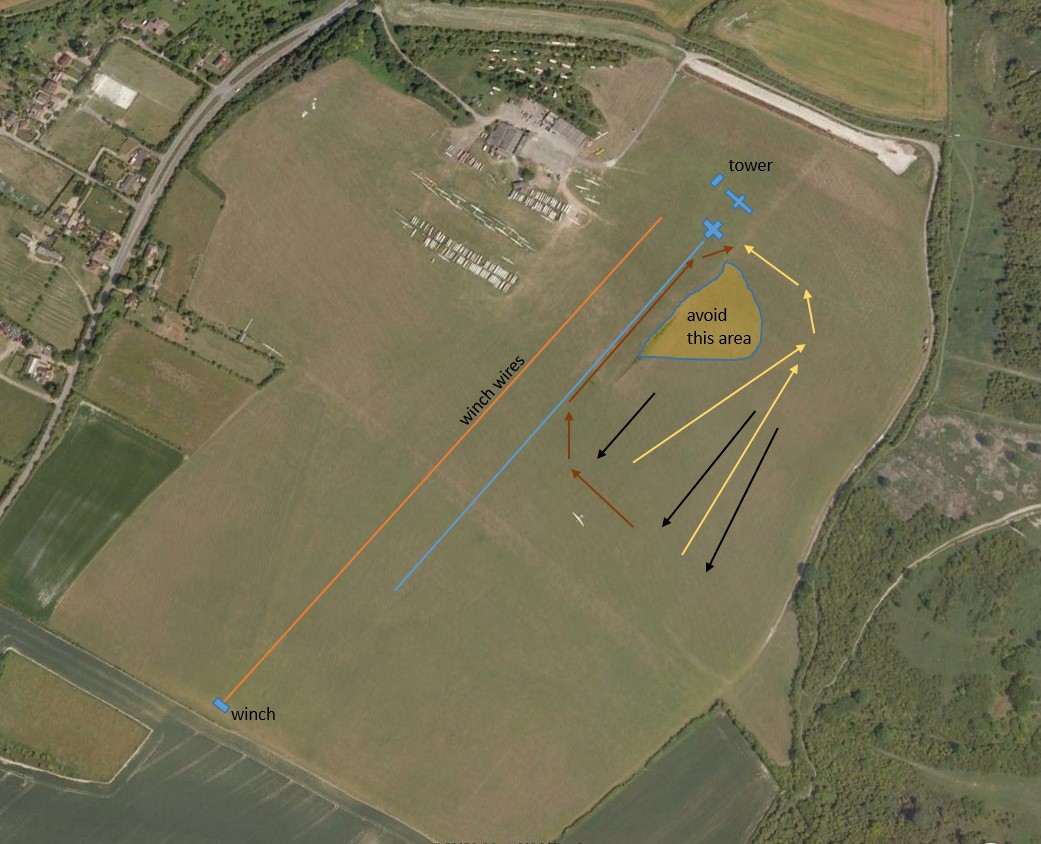
To taxi from the pumps you will need to cross the cables when it is safe to do so, announcing your intentions on the radio. Cross the cables well in front of the cable strops, at 90 degrees, then taxi towards the edge of the gully until the rope is clear of the cables. Do not taxi behind the launch point in any circumstances.
After landing the best route back is along the take-off patch (shown in brown below). Check there are no aero-tow or winch launches about to commence before you do. It has the double benefit of being able to taxi a little quicker and not having to stop for an approaching aircraft. If this is not possible, then taxi back via hangar ridge (shown in yellow), climbing hangar ridge between the centre and the hill which is not quite so steep. You will need to anticipate the power required to climb the ridge, if you do this correctly the power needed can be kept below 1500 rpm. The shaded area, the deep part of the gully and steep upslope, should be avoided.
When taxiing across the rough ground to and from the hangar ridge launch point, taxi slowly and cross the bigger ridges at 45 degrees to avoid the tug nodding.
When returning for fuel, either leave the rope at the launch point and taxi across the cables, or cross the cables mid-field with the rope and taxi carefully down the club side of the cables. Either way will prevent the rope from over-hanging the cables when the tug is stopped.
Take-off
The take-off run should be kept to the take-off patch – this is a 200m x 50m strip set parallel to the gully and 20m in from the gully edge. This sterile strip is used for towing out the winch, glider retrieving and laying out winch cables for the NE run. It is rough and tugs should avoid it. On occasions a glider will not be aligned with the take-off patch and may need to be re-positioned to ensure a take-off on the patch. The surface on the clubhouse side where the winch cables normally lie is too rough and should not be used for take-off.
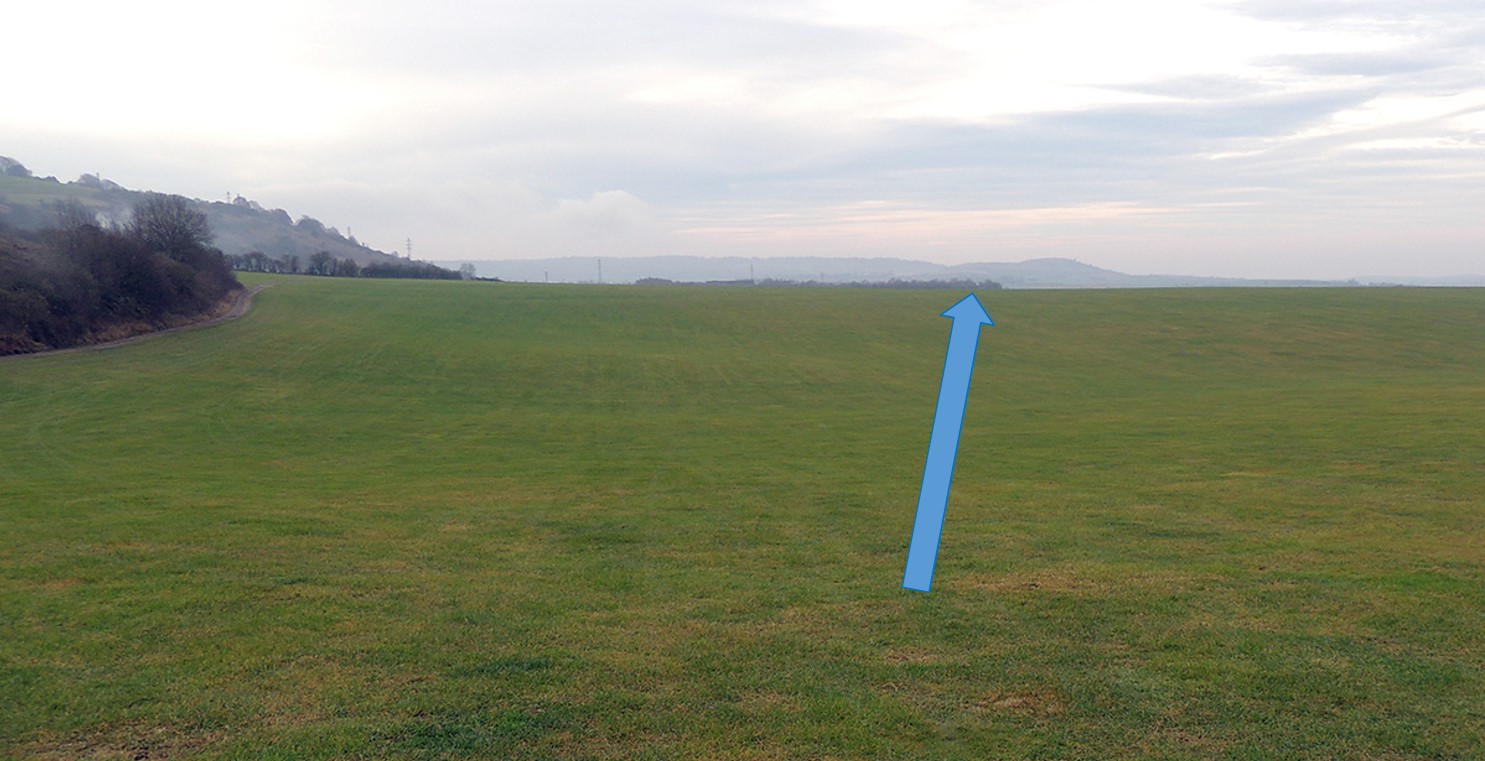
The take-off run from the hangar ridge launch point should be slightly angled away from the hill (see diagram below). This will help with the glider’s wing tip clearance over the slope off the hill and optimise the bumpy take-off path. Also, if wind is off the hill, it will help to avoid the worst of the ‘curl over’. A practical ‘aiming point’ is shown below, the end of the row of high trees or just left of Ivinghoe Beacon, bearing in mind you will lose sight of it as you drop into the dip..
Outbound Routings
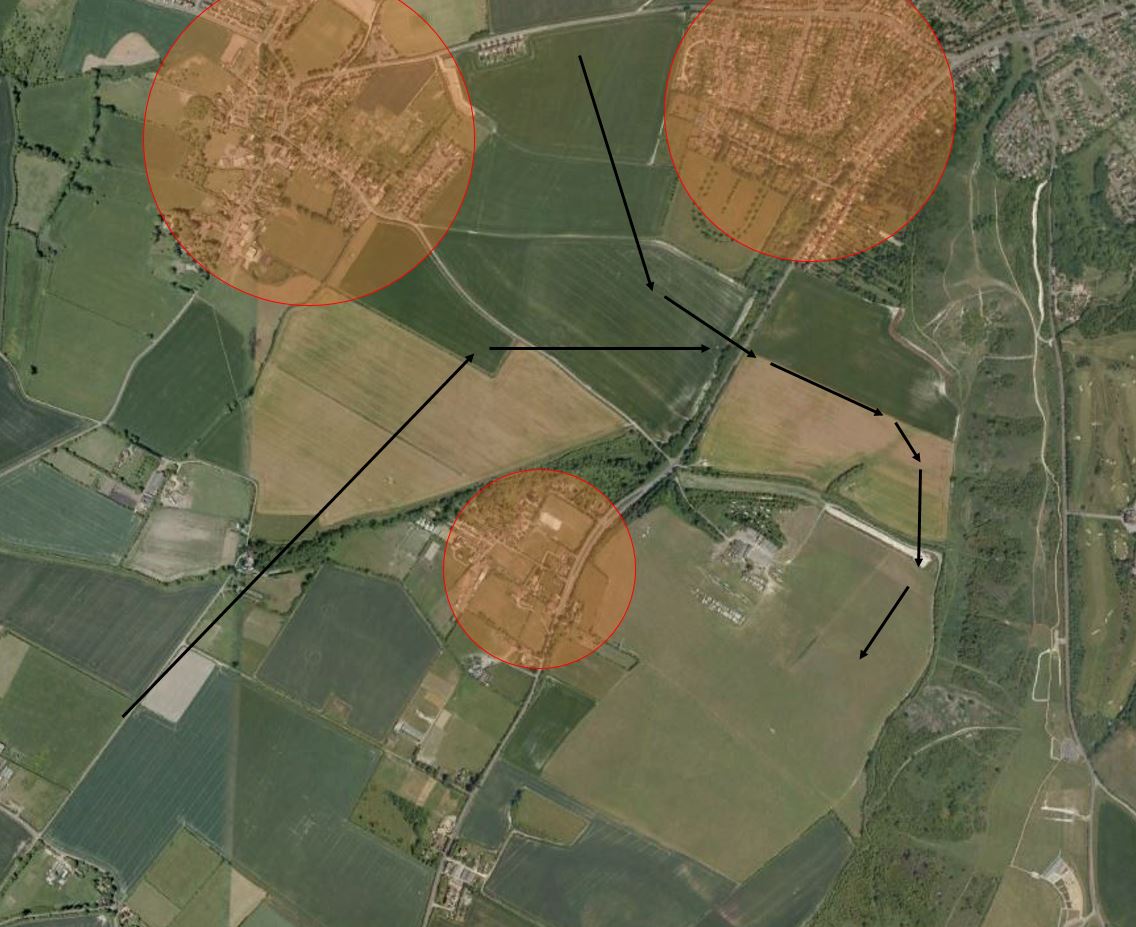
The early options, are shown below. The farm buildings and bungalows should not be overflown nor the house just to the right of the ‘pig farm’. Routing hill side of the ‘pig farm’, involves crossing high power cables, so make sure you have adequate climb performance in order to comfortably clear these wires. Be aware that gliders or vehicles on the North East run landing area may not be visible from the launch point. If the cable tractor is towing up the field, delay launching until it is clear in case of a launch failure. Examples of tow-out patterns.

Landing
The routes to join the base leg will be from the down-wind leg or by coming in through the gap by the cricket pitch. Pilots should avoid overflying any houses as annotated below. The base leg should be flown along the boundary of the two fields, with an early, shallow final turn to keep the tug and it’s rope within the field boundaries. The approach should always be steep enough to ensure an adequate clearance between the rope and the trees on the airfield boundary. A practical way of doing this is to keep the down slope of hangar ridge in view at all times during the approach, then an adequate margin will be achieved. Always land on the up slope beyond the dip. Note that the slope is steeper towards the Tring Road. Should you find yourself landing here, land a little deeper to avoid the steepest part of the slope.
Beware of ‘curl over’ on short finals and in the dip in strong wind conditions.
Landing long or on the East run are alternatives for a crowded landing area. If landing on the East run, announce your intentions on the radio and make a steep approach, landing well into the airfield.
Tugs should not be landed on hangar ridge.
Parking
Tugs should be parked in line with the edge of the gully and well forward of the launch point.
If at hangar ridge, the tug should be parked approximately 2/3rds up the slope next to the perimeter track, facing slightly uphill.
Grid Position
The normal grid position is on hangar ridge, with 4 to 5 gliders abreast. The positioning of the grid reduces the final approach options so should not extend too far towards the clubhouse. Likewise, the take-off can be problematic if the grid is set too far into the field, as the down and up slopes get steeper.
Soft Ground
When considering the launch point for the day, bear in mind the effect of soggy ground on take-off performance and damage to the airfield. The normal SW take-off point is particularly vulnerable to this, so consider using the hangar ridge launch point instead.
Return to ‘Launch Points’ Return to ‘Operations’ Return to ‘Front Page’