Launch Position Taxiing Take-Off Outbound Routings Inbound Routings Landing Parking Grid Position
Launch Position
On our airfield it will be a rare day that the NE run would be first choice for aero-towing. The relatively short run, uphill slope, possible damp grass would be best avoided in favour of a longer, downhill run, albeit with a crosswind from the West run. See ‘Take-off Performance‘ for more detail on this. However, if a winch operation is set up then it will be necessary to aero-tow from the NE run, BUT it must be safe, and there will be occasions when aero-towing cannot be done.
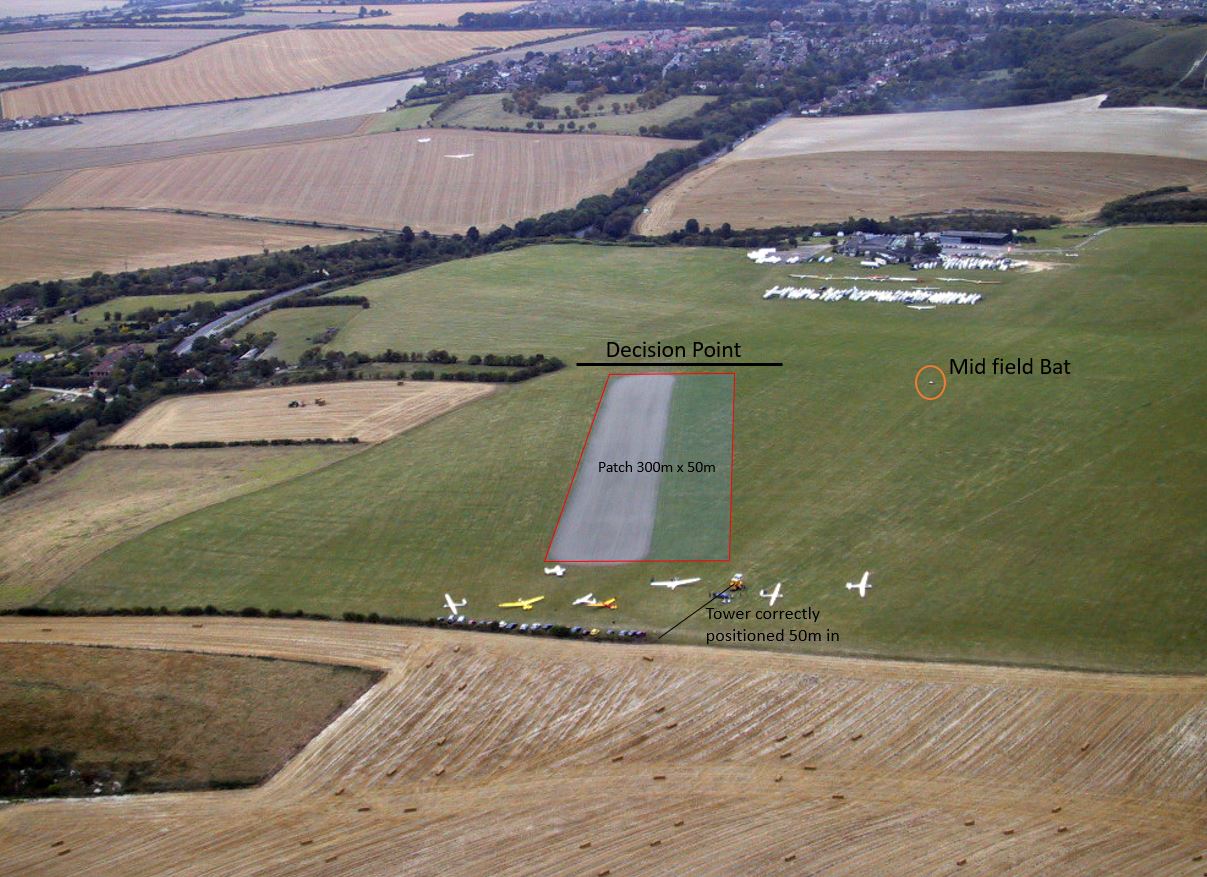
The aero-tow launch point should be set up to the left of the control tower and consist of two gliders abreast. Further gliders should be queued behind or to the left and pulled on line. If the gliders are placed too far from the control tower then the take-off path will be compromised. It is also important that the control tower is positioned correctly to permit full utilisation of the tug take-off area. This is approximately 50m from the edge of the hedge towards the hill. If necessary re-position correctly before commencing operations.
Taxiing
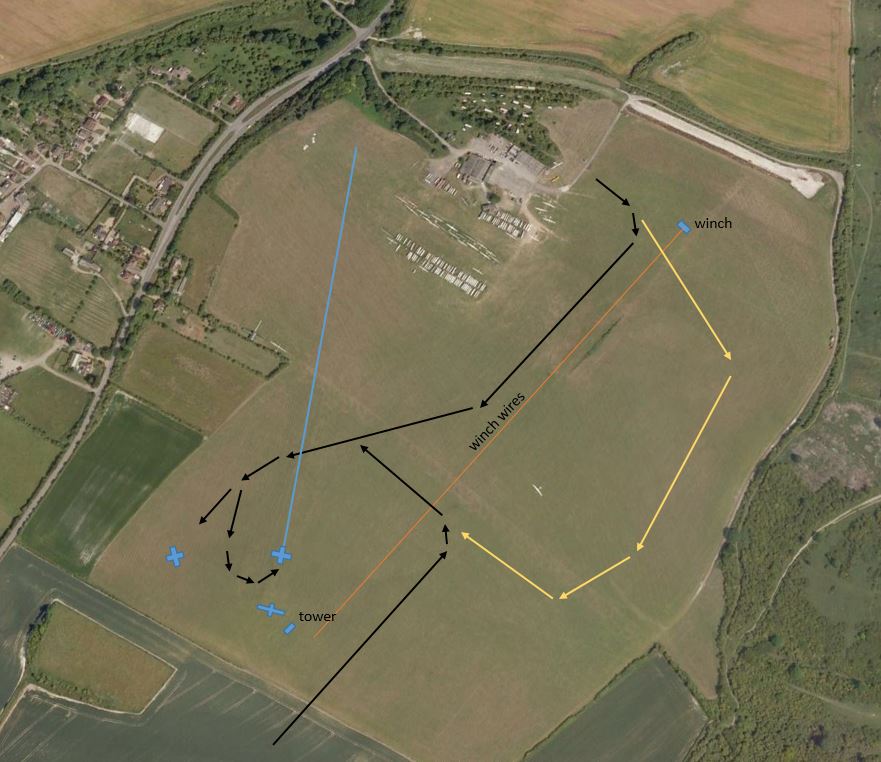
The ideal route (shown in black, below) from the pumps, will be to taxi along the SW run take-off patch across the centre of the airfield, at the top of the upslope turn slightly towards the windsock, taxing well to the right of the launch point (as you look at it) turning into position when you arrive at the launch point. In order to do this radio communication must be made with the winch to ensure that it is clear to do so.
If it is not safe to taxi via that route or radio communication cannot be made, then you should taxi towards the hill (shown in yellow, below), in line with the start of the SW take-off patch, cross the cables and taxi at an angle across the slope (avoiding the steep part) and towards the hill to establish a good margin from the winch operation. Once you can see both tower and winch, and when appropriate cross the cables (shown in black), announcing your intentions on the radio, eg; “CA crossing cables”. The cables should be crossed at right angles and slowly, once your rope has cleared the cables a wide turn across the launching area should be made towards the Tring Road side of the launch point. If you notice any resistance, stop, make a radio call to advise tower and winch then shutdown and investigate.
After landing, check for a winch launch. If a winch launch is about to go consider taxiing towards the hill away from the cables. Assuming it is clear to cross the safest place to cross will be in sight of tower and winch, an announcement on the radio “xx crossing cables” MUST be made. Cross the cables cautiously as described in the previous paragraph.
Tug parking and run up checks should be well away from the gliders towards the Tring Road (shown by the tug symbol).
Take-Off
Before commencing the take-off a mid-field bat MUST be in position to confirm that take-off path is clear beyond the brow. The normal take-off direction will be as shown by the blue line above. Ensure you have enough clearance from the bushes/windsock to accommodate an out of position glider or large wingspan glider, this is particularly important with a crosswind from the right. Use an ‘aiming point’, perhaps a tree on the skyline to help you make a straight take-off.
Decision Point
On this run it is essential to establish a Decision Point, call it a ‘Go or No Go’ decision if you like. This point will be just past the windsock (shown on the first diagram) when a decision to abort would allow space for both tug and glider to stop in what remains of the airfield. At the decision point you must be confident that the combination is, or is about to get, airborne and safely fly over the airfield boundary. If the decision to abort is made, release the glider, and either continue to fly away without the drag of the glider OR cut the throttle and stop the tug on the available ground.
There is frequently unpredictable turbulence in the early part of the climb out. It is usually associated with curl over from the hill and can cause control problems in both tug and glider. If these circumstances occur, stop aero-towing.
Outbound Routings
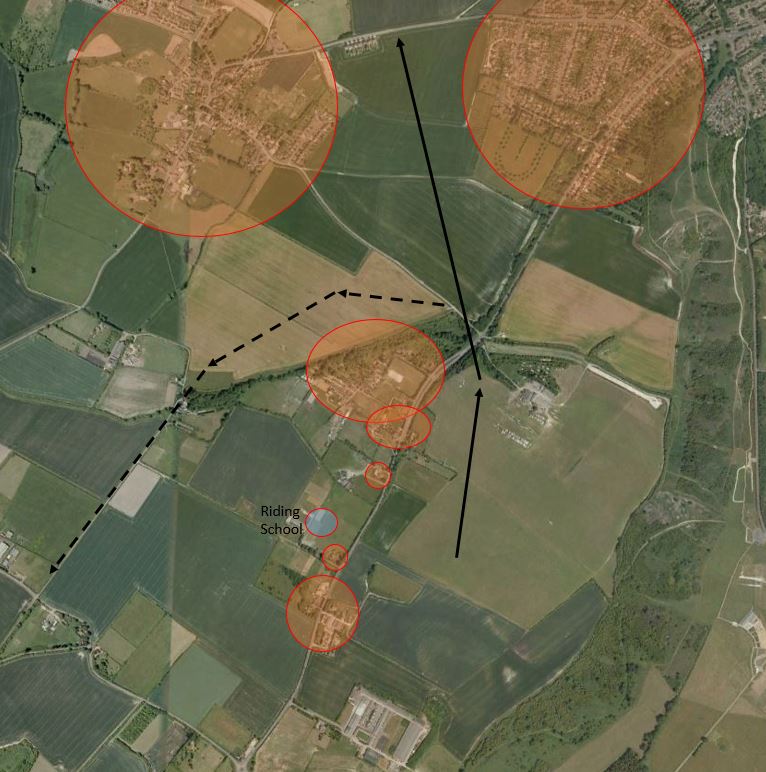
The initial route provides two options; straight out to the left of ‘The Avenue’ and between Dunstable and Totternhoe (as shown below by the fixed line) or a left turn downwind, between Totternhoe and the Tring Road (as shown below by the dashed line) to return overhead later. The first and simplest option is particularly noise sensitive. A reasonable proportion of launches should use the second route. An air experience flight would be an ideal opportunity for this but may not be suitable for training flights or heavy gliders. Be aware of aircraft proceeding downwind and if there is potential for conflict, change your plan. Also advising the glider by radio that you intend to turn left after take-off may be helpful.
Inbound Routings
The approach should be made between the houses to the West of the airfield and the ‘pig farm’ which will result in an angled approach with a left turn on to finals. Note the aiming point is roughly the corner of the airfield and the final approach is on a line extending out to ‘the Knoll’ and South of Edlesborough as shown below. There are three possible routes onto the final approach. a. From a left hand downwind leg. b. Straight in from Edlesborough church and c. From a right hand circuit along the hill.


Landing
Landings should be made to the right of the launch point. This will mean crossing the cables whilst taxiing back (as described above). Be aware of winch launches. If a tug lands alongside the cables, the winch launch should wait until the tug has completely crossed the cables before commencing. However, if the glider’s wings are level you should not assume anything other than the glider might launch and clear towards the hill. It would be worth briefing the ‘duty pilots’ if any issues arise.
Beware of down drafts on short finals and significant wind gradient effects in strong wind conditions. Care should be taken to avoid any low, steeply banked turns in these conditions.
Parking
Tugs should be parked well away from gliders and into the western corner of the airfield.
Grid Position
A grid is not possible on this run. If a grid is required then it should be set up on the West Run. When the time comes to launch the grid, winching should be stopped and any remaining cables pulled in. Once the grid launch is completed, winch cables can be towed out with any further towing taking place on the NE run as described above.
Return to ‘Launch Points’ Return to ‘Operations’ Return to ‘Front Page’